It stopped raining for a whole day so we were able to install the gate that we built a while back.
Looking at this made me squeal with delight.
Nearing the completion of our garden project, we spent Saturday making the area pest proof. We installed the gate, put rocks along the bottom of the fence, and started putting the trim around the lattice.
Gizmo and Leela were around to help.
We created the gate some time ago using a piece of lattice cut to size (it’s something like 3.5 feet wide) and four 2x4’s on each side. The lattice is sandwiched between the eight boards. Then we bought a self-closing gate kit at Lowe’s. It was very easy to install. We first had to decide which way the gate would swing. We hopefully picked the way that is the most functional for anybody who would want to come down here!
Mike was able to do most of the installation himself, so I was able to snap some pictures. Just screw the hinges on, and put the latch on, and you’re done! We also bought a handle, but since the gate is self-closing, it’s really just for show. We haven’t put it on the gate yet.
As you can see, there is still a lot of lumber remaining in our garden! We did get a start on making the pile smaller by framing out the lattice on the fence.
This is going pretty quick, so hopefully it’ll be done soonish.
Mike filled in the gaps in the fence with some large rocks that we dug up while putting up the fence. I spent most of my time weeding and laying down mulch. More of that to come later. It’s really starting to look nice!
Once the mulch is down and the trim and header is put on the fence, we will be able to call this thing done!
Showing posts with label Pressure Treated Wood. Show all posts
Monday, June 10, 2013
Tuesday, May 21, 2013
Building a Raised Garden Bed
I’ll be the first to admit that the Notre Ferme Urbaine household was a little over ambitious with our garden plans. Three raised beds, a chicken coop, a fence? That’s a lot more work than we are used to doing. But we had big plans this year and we were not going to give up on that. The garden beds were not too difficult compared to the fence, but took a lot of planning and required a lot of lumber.
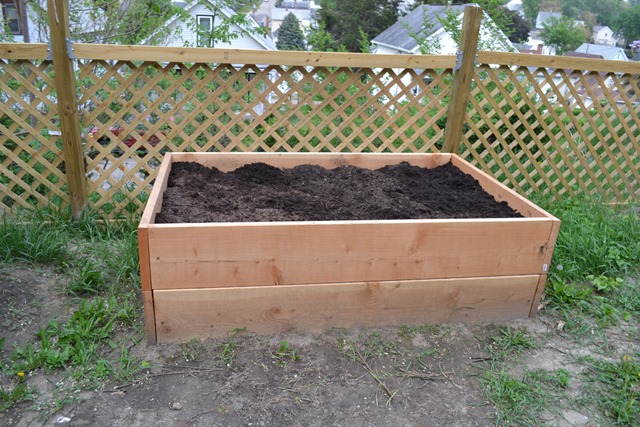
Mike thinks I'm crazy about my views on pressure-treated lumber, but everything I read said that you shouldn't trust it to grow your plants around. Heck, Lowe’s has a big warning sign in front of their pressure-treated lumber, so I was adamant about using untreated pine (cedar is a really good option if you are able to find/afford it). One thing about untreated is that it does not last as long (like only a few years) so you have to keep that in mind. I've read that putting linseed oil on the wood will help preserve the beds longer. Because I am an extreme novice in woodworking and life in general, please do your own research if you are using lumber for your garden beds and decide for yourself.
Our beds are two feet high. Most raised beds are a foot high, which is a good height. If you're crazy like me and want to add a lot of work to your project, you can go to two feet. The primary reason I chose two foot high beds was for pest protection. Hopefully keeping it raised this high will keep out some of my crops’ predators. It will also be helpful for keeping our chickens and dog out of the beds. Also I don't have to bend over as much to pull weeds!
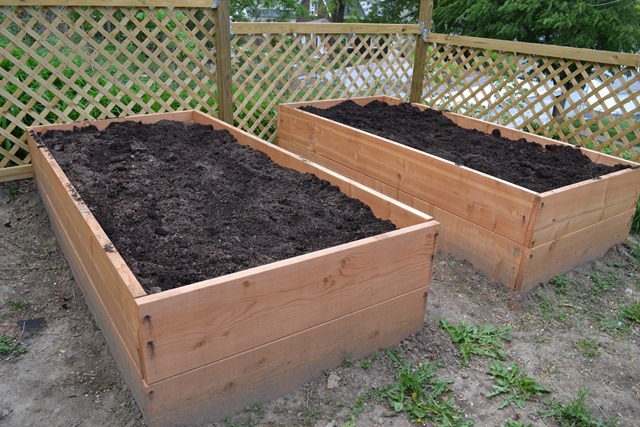
Okay, first step: purchase a ton of lumber that requires you to take it home in two trips in your mid size car. The first two beds are a standard 4x8 size and each required four 2”x12”x8’ boards, four 2”x12”x4’ boards, four 4”x4”x2’ posts, and some nails. When we got to Lowe’s there was a pack of 2”x2”x2’ posts all ready to go and we decided that would suffice for the 4”x4” posts. Just to let you know…they do not suffice. Taking this shortcut was stupid and not a shortcut at all. The boards kept popping out of the posts and it took forever.

Because I’m a terrible blogger, I only managed to get a couple of pictures of the construction of the garden beds. Basically, we nailed the posts to the long eight foot long boards. The posts were put in three inches from the top, leaving three inches to be put underground. Then we added the short four foot long boards to the posts.

At this point your beds are half done. Then you can add the rest of the boards to the bottom. It took both of us to turn the bed over, but after that it was easy street. We both took some turns hammering the posts into the ground.

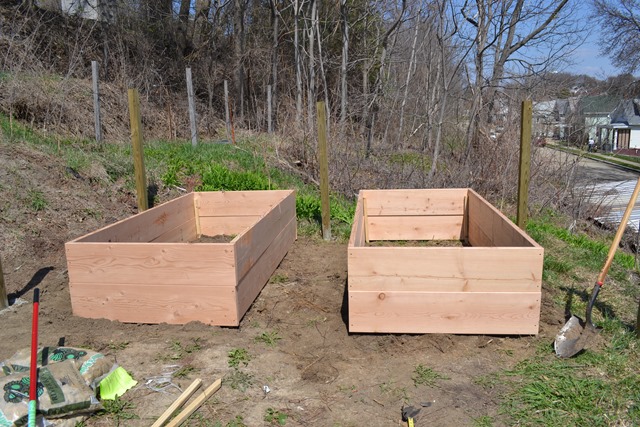
Once we had the beds somewhat put into place, we had to level the ground a bit and fill in any cracks with dirt. Then we hammered the posts in some more.
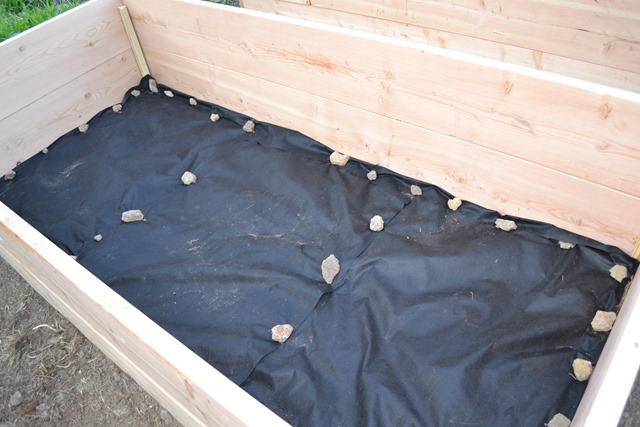
I lined the beds with garden cloth to get a jump start on weeds. I don't totally trust garden cloth after what we had to go through with clearing out the garden and the fact that weeds are already popping through the garden cloth in the coop, but I put it in anyway.

We had to order four cubic yards of compost/soil mix and also used our to bins of compost to fill our three garden bins. Then we added 20 bags (1.5 cubic feet each) of organic vegetable planting soil.

All done! I have started filling them so I will let you know soon what I put in them. Things are slowly falling into place!
Stuff we still need to work on:
Mike thinks I'm crazy about my views on pressure-treated lumber, but everything I read said that you shouldn't trust it to grow your plants around. Heck, Lowe’s has a big warning sign in front of their pressure-treated lumber, so I was adamant about using untreated pine (cedar is a really good option if you are able to find/afford it). One thing about untreated is that it does not last as long (like only a few years) so you have to keep that in mind. I've read that putting linseed oil on the wood will help preserve the beds longer. Because I am an extreme novice in woodworking and life in general, please do your own research if you are using lumber for your garden beds and decide for yourself.
Our beds are two feet high. Most raised beds are a foot high, which is a good height. If you're crazy like me and want to add a lot of work to your project, you can go to two feet. The primary reason I chose two foot high beds was for pest protection. Hopefully keeping it raised this high will keep out some of my crops’ predators. It will also be helpful for keeping our chickens and dog out of the beds. Also I don't have to bend over as much to pull weeds!
Okay, first step: purchase a ton of lumber that requires you to take it home in two trips in your mid size car. The first two beds are a standard 4x8 size and each required four 2”x12”x8’ boards, four 2”x12”x4’ boards, four 4”x4”x2’ posts, and some nails. When we got to Lowe’s there was a pack of 2”x2”x2’ posts all ready to go and we decided that would suffice for the 4”x4” posts. Just to let you know…they do not suffice. Taking this shortcut was stupid and not a shortcut at all. The boards kept popping out of the posts and it took forever.
Because I’m a terrible blogger, I only managed to get a couple of pictures of the construction of the garden beds. Basically, we nailed the posts to the long eight foot long boards. The posts were put in three inches from the top, leaving three inches to be put underground. Then we added the short four foot long boards to the posts.
At this point your beds are half done. Then you can add the rest of the boards to the bottom. It took both of us to turn the bed over, but after that it was easy street. We both took some turns hammering the posts into the ground.
Once we had the beds somewhat put into place, we had to level the ground a bit and fill in any cracks with dirt. Then we hammered the posts in some more.
I lined the beds with garden cloth to get a jump start on weeds. I don't totally trust garden cloth after what we had to go through with clearing out the garden and the fact that weeds are already popping through the garden cloth in the coop, but I put it in anyway.
We had to order four cubic yards of compost/soil mix and also used our to bins of compost to fill our three garden bins. Then we added 20 bags (1.5 cubic feet each) of organic vegetable planting soil.
All done! I have started filling them so I will let you know soon what I put in them. Things are slowly falling into place!
Stuff we still need to work on:
- Clearing out all the weeds (again) and laying down mulch.
- Putting up compost bins in the corner.
- Getting the fence done! Trim, post caps, a gate!, filling in gaps with soil.
Subscribe to:
Posts (Atom)